Blog
A Step-by-step Guide to Renting Out a Condo in Singapore
Published 18 March 2025
TL;DR / Summary:
– Renting out a condo in Singapore involves checking eligibility and pricing your unit to signing thetenancy agreement and handing over the keys.
– No MOP applies to private condos, butshort-term rentals under 3 months are not allowed, and occupancy is capped at 6 unrelated persons (or 8 for units ≥90 sqm with URA registration until 31 Dec 2028).
– Screen tenants carefully before committing — check income, pass validity, and number of occupants upfront to avoid costly issues down the line.
– Once the TA is signed, the tenant has 14 days to stamp it with IRAS. Keep your stamped copy as it is your primary document if any disputes arise.
Renting out a condo in Singapore can be a reliable source of passive income — but only if you approach it the right way. From checking your eligibility and pricing the unit correctly, to vetting tenants and stamping the tenancy agreement, the process involves more steps than most landlords expect.
Whether you are a first-time landlord or returning to the rental market, this is your complete guide.
(If you’re an HDB owner, you can read our guide for renting out flats instead.)
Steps to Rent Out Your Property:
- Step 1: Check Your Eligibility to Rent Out a Condo
- Step 2: Determine the Right Rental Price
- Step 3: Prepare Your Unit and Take Strong Listing Photos
- Step 4: List Your Property
- Step 5: Find and Vet Your Prospective Tenants
- Step 6: Arrange Viewings and Receive an Offer
- Step 7: Collect the Letter of Intent (LOI) and Good Faith Deposit
- Step 8: Issue and Finalise the Tenancy Agreement (TA)
- Step 9: Get the Tenancy Agreement Stamped with IRAS
- Step 10: Conduct a Handover Inspection and Hand Over the Keys
- Congratulations! You’ve Now Successfully Rented Out Your Private Property or Condo!
- Frequently Asked Questions About Renting Out a Condo in Singapore
Step 1: Check Your Eligibility to Rent Out a Condo
Unlike HDB flats, private condominiums in Singapore have no Minimum Occupation Period (MOP). You can rent out your condo immediately after purchase, and this applies to Singapore Citizens, Permanent Residents, and foreigners alike.
However, there are a few rules you must follow under URA (Urban Redevelopment Authority) guidelines:
- The minimum rental period is 3 consecutive months. Short-term rentals of less than 3 months (such as Airbnb-style lets) are not permitted without URA approval.
- The standard occupancy cap is 6 unrelated persons. However, from 22 January 2024 to 31 December 2028, larger private residential properties of at least 90 sqm are allowed to house up to 8 unrelated persons. A one-time administrative fee of S$20 applies per registration.
- If the entire unit is occupied by a single family with no subletting, the occupancy cap does not apply.
- If you are renting out individual rooms within the condo, all occupants in the unit, including yourself if you live there, count collectively against the applicable cap.
💡 Pro Tip: If you are unsure whether your specific situation falls within the rules, you can check directly with URA or speak to a licensed property agent before proceeding.
Step 2: Determine the Right Rental Price
Pricing your condo correctly from the outset is one of the most important decisions you will make as a landlord. Overpricing leads to extended vacancy periods; underpricing means you leave money on the table.
Here’s how to arrive at the right rental price:
- Check recent transacted rents in your area using URA’s Rental Statistics portal. Look for comparable units by size (psf), floor level, and furnishing status.
- Factor in your unit’s condition and furnishing. A fully furnished unit with quality fittings will typically command 10 to 20% more than an unfurnished equivalent.
- Account for current market conditions. Condo rents in Singapore fluctuate with supply, demand, and macroeconomic factors. Research what is currently being asked and transacted, not just listed.
- Consider your target tenant profile. Expats on company-sponsored housing may have higher budgets; locals and Employment Pass holders on personal budgets will be more price-sensitive.
💡 Pro Tip: Listing at a slightly competitive rate can attract more viewings quickly, reducing vacancy and giving you stronger leverage in negotiations.
Step 3: Prepare Your Unit and Take Strong Listing Photos

First impressions in rental listings are formed within seconds. A poorly photographed or cluttered unit will generate fewer enquiries and attract lower offers, even if the property itself is excellent.
Here’s how to prepare your condo unit before listing:
- Deep clean every room, including bathrooms, kitchen surfaces, and inside cabinets.
- Declutter and remove all personal items. The unit should look move-in ready and neutral.
- Fix any minor defects: leaking taps, flickering lights, faulty locks, chipped tiles. Small issues signal poor maintenance and give tenants grounds to negotiate the rent down.
- Check that air-conditioning units are serviced and functioning.
For a more detailed walkthrough on getting your condo unit market-ready, read our guide on how to stage your home here.
Photography Tips for Rental Listings:
- Shoot during the day when natural light is at its best.
- Use wide-angle shots to make rooms appear more spacious, but do not distort the images.
- Capture all key areas: living room, master bedroom, kitchen, bathrooms, and any outdoor or facilities views.
- Choose your strongest image as the cover photo. This determines whether someone clicks through.
💡 Pro Tip: If budget allows, consider hiring a professional property photographer. The cost is typically recouped within days of faster vacancy turnaround.
Step 4: List Your Property
Now that you have your listing images ready, it’s time to put your listing up on property portals. And lucky for you, you can post your listing for free on our Ohmyhome app.

Our app also allows you to chat with tenants directly, so remember to turn on your notifications to see any enquiries from interested tenants immediately.
Here’s how you can do that:
- Create an account using either your Facebook, Gmail or mobile number
- Choose your journey and select I am a ‘Landlord’
- Tap ‘My Properties > Choose Home Rental
- Enter your Postal Code > Choose the address of your property > select property type and other details
- Upload beautiful photos of your home rental and ‘Post’
We also just rolled out our Manual Verification feature on the Ohmyhome app, which allows private property owners who list their homes for rent (and for sale) to be verified and gain the trust of all interested parties on Ohmyhome. This simply means you can now prove, through our Manual Verification process, that you do own your home and are the legal owner of the property. This is part of our continued effort to improve trust on our platform and protect our tenants from rental scams.
Step 5: Find and Vet Your Prospective Tenants
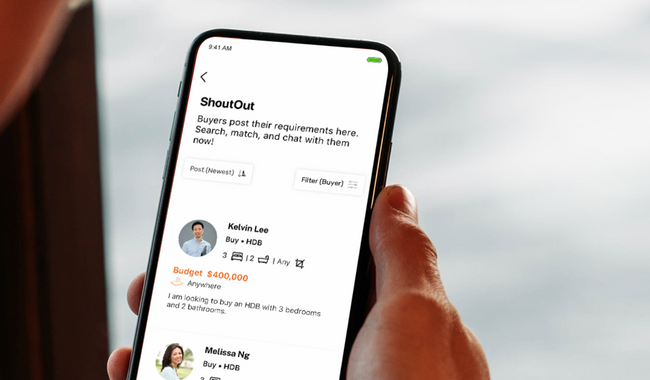
Beyond listing your unit, Ohmyhome’s ShoutOut feature lets you take a more proactive approach. You can browse public ShoutOuts posted by tenants stating their property preferences — their budget, preferred location, and number of rooms they need. If a ShoutOut matches your unit, you can click “Suggest Listing” and start a conversation directly. No upfront costs involved.
Here’s how to find tenants via Ohmyhome’s function ShoutOut:
- Log in to Ohmyhome
- Tap “More” at the bottom navigation bar
- Select “ShoutOuts” to browse active tenant requests
To narrow your search, tap “Filter” to sort by budget, nationality, gender, and more, then tap “Done.” Once you find a match, suggest your listing immediately.
You can download the Ohmyhome app here. It’s available on both the App Store and Google Play.
What to Screen for Once You Have Interested Tenants
- Employment and Income Verification: Request recent payslips or a letter of employment. A general rule of thumb is that monthly rent should not exceed one-third of the tenant’s gross monthly income.
- Rental History: Ask whether they have previously rented in Singapore and if they can provide a reference from a prior landlord.
- Visa and Pass Status: For foreigners, confirm their pass type (Employment Pass, S Pass, Dependent Pass, etc.) and expiry date. The lease duration should not exceed the validity of their pass.
- Number of Occupants: Confirm exactly how many people will be living in the unit — this matters both for URA’s occupancy cap and for managing wear and tear.
- Purpose of Rental: Residential use only. A tenant intending to run a business from the unit is generally not permitted under standard residential tenancy agreements.
💡 A tenant who is evasive about their employment status or reluctant to provide basic documentation is a red flag — regardless of how well the viewing went.

Step 6: Arrange Viewings and Receive an Offer
Once you have shortlisted interested parties, arrange viewings at a time that allows you, or your agent, to be present and address questions directly. Viewings are also your opportunity to assess the prospective tenant in person.
During the viewing:
- Be transparent about any known issues with the unit (noise from neighbouring units, ongoing development nearby, etc.). This builds trust and avoids disputes later.
- Have the key terms in mind: preferred lease duration, rental price, whether pets are allowed, and the timeline for move-in.
- Be responsive. Serious tenants often view multiple units concurrently. A delayed response can cost you a good tenant.
Once a tenant expresses interest, prompt them to formalise their offer. On platforms like Ohmyhome, this can be done directly within the chat thread to keep everything documented.
Step 7: Collect the Letter of Intent (LOI) and Good Faith Deposit

You may also ask for an LOI and a good faith deposit to ensure the tenant is serious about renting your private property or condo.
Now, What’s a Letter of Intent? (LOI)?
A Letter of Intent (LOI) is a formal written document from the tenant expressing their intent to rent the unit. It is not legally binding in the same way as the Tenancy Agreement, but it sets out the preliminary terms agreed upon by both parties before the TA is drafted.
A standard LOI typically includes:
- The proposed monthly rental
- Lease start and end dates
- Name and particulars of the landlord and tenant
- Any special requests or conditions the tenant wishes to include (e.g., specific furniture, repainting, additional fixtures)
And, What’s a Good Faith Deposit?
A good faith deposit is typically equivalent to one month’s rent, payable at the time the LOI is issued. It signals that the tenant is serious about proceeding.
- Once you receive both the LOI and the good faith deposit, you must stop advertising the unit.
- If you as the landlord reject the LOI after receiving the deposit, you must return it in full.
- If the tenant backs out after the LOI is signed, the good faith deposit is typically forfeited.
- The good faith deposit is usually converted to the first month’s rent upon signing of the TA.
Step 8: Issue and Finalise the Tenancy Agreement (TA)
The Tenancy Agreement is the legally binding contract that governs the rental arrangement between you and your tenant. It should be drafted carefully and reviewed by both parties before signing.

Key terms to include in the Tenancy Agreement:
- Full legal names and NRIC / Work Pass numbers of both landlord and tenant.
- If the tenant is a foreigner employed by a company, the company’s registered address should also be stated.
- Rental amount and payment schedule.
- Lease duration, start date, and end date.
- Security deposit amount (typically equivalent to one month’s rent for a 1-year lease; two months for a 2-year lease).
- Minor repairs clause: the threshold up to which the tenant is responsible for repair costs (typically S$200–S$250 per incident).
- Air-conditioning servicing responsibilities and frequency.
- Permitted occupants and whether subletting is allowed (in most cases it is not).
- Diplomatic clause: if included, this allows either party to terminate the lease early (typically after 12 months in a 2-year lease), with one to two months’ written notice.
- Reinstatement clause: what the tenant is required to restore upon vacating.
💡 Pro Tip: Both parties should sign in the presence of a witness. Make sure both the landlord and tenant receive a signed original copy.
Step 9: Get the Tenancy Agreement Stamped with IRAS
Once the TA is signed, it must be stamped by the Inland Revenue Authority of Singapore (IRAS) to be legally enforceable. Stamping is the responsibility of the tenant and must be done within 14 days of signing.
The tenant can do this via:
- The IRAS e-Stamping portal at mytax.iras.gov.sg
- A Singapore Post outlet
If the tenant signs the TA while overseas, stamping must be completed within 30 days of signing, or within 14 days of the signed TA arriving in Singapore, whichever is earlier.
💡 Pro Tip: Keep a stamped copy of the TA for your records. This is your primary document if any tenancy disputes arise.
Step 10: Conduct a Handover Inspection and Hand Over the Keys
The handover is the final step before your tenant moves in, and it is worth doing properly. A well-documented handover protects both parties and prevents disputes at the end of the tenancy.
Here’s what to prepare for handover:
- Inventory List: A detailed list of all items in the unit (furniture, appliances, fixtures) and their condition at the start of the tenancy. Both parties should sign this document.
- Condition Photos: Take date-stamped photographs of every room, including any existing marks, scratches, or wear. Share these with the tenant and keep a copy.
- Meter Readings: Record the electricity, water, and gas meter readings on the handover date. This prevents billing disputes later.
- Keys and Access Cards: Issue all keys, access cards, and fobs. Document how many sets were handed over.
- Utilities Account Transfer: Ensure the SP Group electricity and water account is transferred to the tenant’s name from the start of the tenancy.
💡 Pro Tip: Walk through the unit together with the tenant on handover day and address any outstanding concerns before they take possession. It is much easier to resolve issues before move-in than after.
If you’ve reached this stage…
Congratulations! You’ve Now Successfully Rented Out Your Private Property or Condo!

Renting out a condo in Singapore takes more effort upfront than most people expect, but get those early decisions right and the rest of the process is relatively smooth sailing.
If you would like a hand with any part of it, Ohmyhome’s licensed property agents are available to help — whether that’s finding the right tenant, figuring out how much to charge, or making sure your tenancy agreement covers what it needs to.
Connect with our Super Agents on WhatsApp today and get the help you need to rent out your condo quickly and hassle-free.
Frequently Asked Questions About Renting Out a Condo in Singapore
1. Can I rent out my condo immediately after buying it?
Yes. Unlike HDB flats, private condominiums in Singapore have no Minimum Occupation Period. You can rent out your unit as soon as you take ownership.
2. How much can I rent out my condo for in Singapore?
Rental prices vary significantly by location, unit size, floor level, and furnishing. You can check current transacted rents on the URA website or consult a licensed agent for a more accurate valuation based on your specific unit.
3. What is the minimum rental period for a condo in Singapore?
Under URA guidelines, the minimum rental period for a private residential property is 3 consecutive months. Rentals shorter than this are not permitted without specific URA approval.
4. How many tenants are allowed in a condo?
The standard occupancy cap is 6 unrelated persons per unit. However, from 22 January 2024 to 31 December 2028, units of at least 90 sqm are permitted to house up to 8 unrelated persons, provided the landlord registers with URA in advance and pays a one-time S$20 administrative fee. Family units living together are exempt from this cap.
5. Do I need a property agent to rent out my condo?
No, you are not legally required to use an agent. Many landlords rent out their units independently using property portals. However, an agent can help with pricing, tenant vetting, and drafting the tenancy agreement, which can be especially useful for first-time landlords.
6. How do I list my condo for rent on popular online platforms in Singapore?
You can list your condo for rent on property platforms in Singapore like Ohmyhome by simply downloading the app, creating a free account, selecting “Landlord” as your journey, and navigating to My Properties to post your listing. Upload photos, enter your unit details, and publish. Ohmyhome also offers a Manual Verification feature so tenants can confirm you are the legitimate owner of the property.